TheLight Goose Conservation Order (LGCO)is set to begin soon across the birds’ traditional wintering grounds, and while the coming weeks are certain to provide challenges to hunters, there are reasons to be optimistic heading into this popular option for those looking to extend the waterfowl hunting season.
Light goose hunters in the southern reaches of the Central and Mississippi Flyways are likely to benefit in the short term from a line of ice and snow that currently extends across Kansas and Missouri, with deeper snow levels found in eastern Nebraska, Iowa and the Dakotas. These conditions should keep the geese from pushing too far north until the first real warm-up arrives across the midlatitude states.
What really has hunters excited is the apparent increase in the number of juvenile snows, blues and Ross’s geese staging on their wintering grounds.
“From the snow geese that I’ve observed this winter, I’d say that the flocks are made up of around 10 to 15 percent juvenile birds, which is a huge step up from last year,” says Trevor Manteufel with Eaglehead Outdoors, who will be based in Arkansas for the start of the LGCO. “On the negative side, the geese that are here have been here a while just hanging out. They are incredibly stale and will probably remain tough to hunt until we get a push of birds from the south. I just keep telling myself that things can’t be as bad as last year.”
The 2019 LGCO was certainly filled with challenges. Flocks comprised almost entirely of savvy adult birds combined with unfavorable weather and habitat conditions made for a frustrating spring for many hunters, including those in Nebraska, which regularly offers some of the continent’s best light goose hunting opportunities. This spring, however, Mark Vrtiska with the Nebraska Game and Parks Commission believes that hunters in that state could see an improved harvest oflight geese.
“We tend to stop more snow geese in the spring when we have more water on the landscape, and this year we have water everywhere, particularly along the eastern side of the state in the Missouri River valley,” Vrtiska says. “I’m really curious to see how that amount of shallow water impacts the migration, because I’ve never seen conditions like this in all my years at this job.”
Lingering snow and ice pushed back last year’s migration of light geese throughNebraska, but once again, Vrtiska is optimistic for a different outcome in 2020.
“I’m sure guessing that we’ll see an earlier migration this year, but a lot can change in the coming weeks. Last year was just so different that it’s hard to believe that we’ll see something like that again,” Vrtiska says. “What we do know is that there is decent snow pack in South Dakota, North Dakota and I believe up into Prairie Canada, too, which should hold those birds back a bit and help increase hunter harvest.”
5 GREAT SQUIRREL RECIPES YOU WON'T BE ABLE TO RESIST
These five of our favorite squirrel recipes are guaranteed to get your mouth watering.
These squirrel meat recipes will have you heading off to the woods tobag some squirrelsfor dinner!
Some would say young squirrels taste the best, but once you try it for the first time, you'll finally catch on to what the rest of usalready know. These aren't the type of thing you'll find on AllRecipes all that often, so we thought we'd serve as a source.
They're simple, but if you want to cook those squirrel legs and other meat the right way, follow these directions.
We've collected some of the best squirrel recipes from all over, and wanted to offer up a variety of styles to highlight ourfavorite ways to cookthese small but tasty critters.
1. Baked Squirrel
4 cut up squirrels (use only hind legs and meaty back pieces)
1 chopped green bell pepper
2 Tbsp butter
4 Tbsp. red wine
1 can cream of mushroom soup
1/4 c. vinegar
1 chopped onion
4 Tbsp. salt
1 tsp. Adolph's tenderizer
1 tsp. pepper
1to 1 and 1/2 cups all-purpose flour
Crisco and cooking oil
Mix vinegar and salt with water to cover squirrel. Soak 2 hours in solution. Remove pieces and shake on tenderizer and pepper. Roll in flour. Fry in Crisco until golden brown. Place pieces in baking dish.
In another skillet saute onion and pepper in butter. Add wine and soup. Mix well. Pour over squirrel. Bake at 350 degrees for 30 minutes.
Cut squirrel into small chunks of frying size pieces, salt and pepper then roll in flour until coated well. Put in skillet of hot oil and fry until golden. Remove squirrel and most the oil, then add water and bring to boil. Place squirrel back into the skillet, turn to low heat,cover and cookfor approximately 1 hour.
Serve with some large potatoes that have been baked for a great combination.
Pat meat dry with paper towel to remove any moisture. Dip squirrel in egg. Combine bread crumbs with flour, dip egg-covered squirrel in mix. Cover bottom of skillet with olive oil and canola oil, add butter and brown meat well (about 20 min). Put squirrel in baking dish and pour contents of skillet over meat. Bake for one hour at 375°F.
4. Belgian Squirrel
3 largesquirrels
1/2 cupbutter
2onions, sliced
3 tablespoonswhite vinegar
1/8 teaspoondried thyme
salt and pepper to taste
18pitted prunes
1 1/2 teaspoonsall-purpose flour
1 cupcold water
Cleansquirrels. Burn away any fur that clings. Rinse the meat though several changes of water and pat dry. Cut squirrels into serving pieces.
Preheat the oven to 375 degrees F.
Melt the butter in a large skillet over medium heat. Add squirrel pieces and fry until browned on all sides, but do not cook through. Remove the squirrel pieces to a large Dutch oven or oven safe crock. Add onions to the butter in the skillet; cook and stir until tender and browned. Pour the onions and butter into the pot with the squirrel. Fill with enough water to almost cover the meat. Mix in the vinegar and season with thyme, salt and pepper. Cover and place in the oven.
Bake for 45 minutes in the preheated oven. Remove the pot from the oven and add the prunes. Return to the oven and reduce the heat to 325 degrees F. Continue baking for another 45 minutes.
Remove the pot from the oven. Mix theflour and cold watertogether in a cup. Use a slotted spoon to remove the meat and prunes to a serving dish. Set the pot on the stove and bring to a boil over medium-high heat. Stir in the flour and water and simmer, stirring constantly, until the gravy is thick enough to coat a metal spoon. Serve meat with a lot of gravy.
5. Squirrel Country Sausage
4 ½ lbs. squirrel (approx. 15 fox squirrels)
1 Tbsp. sage
2 lbs. fresh seasoned pork sausage (with sage)
2 tsp. basil
1 onion
3 tsp. margarine
3 garlic cloves
1 Tbsp. chili powder
4 Tbsp. fresh parsley
1 Tbsp. black pepper
2 Tbsp. salt
1 tsp. thyme
De-bone the squirrel and chop in food processor. Mix together with fresh pork. Mince the onion and garlic (Use a tablespoon of garlic powder if you don't have cloves).
Cook the onion until transparent and add the garlic and sauté slightly. Mix together meats, onion, garlic and herbs.
To test seasonings, form a small patty and fry in a cast iron frying pan with butter. Taste and adjust seasonings accordingly.
Form into small patties to cook or grill and use with your favorite sausage recipes. Great on pizza, with pancakes or scrambled in eggs.
Squirrel can be a delightful wild-game meal and will maybe make your yard a bit quieter.
Enjoy!
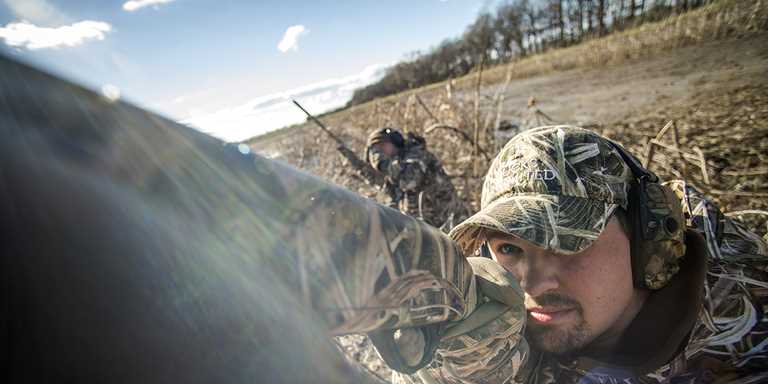
Quick Fixes for Better Shooting
Follow these 25 simple tips to bag more ducks and geese
By Phil Bourjaily
Shotgunning is simple. In fact, the phrase "eye on the target, head on the stock" covers about 95 percent of what you need to know. In theory, at least. In practice, however, it's all about the other 5 percent—the tiny details that can mean the difference between a big day in the field and an empty duck strap. Here are 25 tips that will help you fine-tune your shooting technique for waterfowl.
TIPS FOR SHOTGUNS
Quick Fix #1: Cut the Kick
Recoil builds bad shooting habits. Cutting the kick makes you a better shot. The best recoil reducer is a lighter load. If your gun beats you up, try a load that's 1/8 ounce lighter and 100 fps slower. A gas-operated autoloader is the second-best recoil reducer, especially if the gun has some heft to it. A good recoil pad such as a LimbSaver or Kick-Eez is yet another buffer against felt recoil. Combining all three can make your shooting a lot more comfortable and successful.
Quick Fix #2: Blacken the Bead
The shotgun bead is not there to be looked at. You're supposed to see it in your peripheral vision to help you keep track of the muzzle-target relationship as you look at the target. As soon as your focus shifts to the bead, the gun stops moving and you miss behind the bird. If the bead distracts you, replace it with a less obvious sight, remove it completely, or blacken it with a permanent marker.
Quick Fix #3: Be Prepared for Problems
A cleaning rod is a handy tool to have with you in case a shot wad, or even mud, gets stuck in the barrel. And sometimes a spray of Break Free CLP or G96 Gun Treatment will help you get through a hunt when a grimy gun becomes sluggish. For any repairs beyond that, the best insurance is an extra gun.
Quick Fix #4: Shorten Up the Stock
Late in the season, when you're bundled up in heavy clothing, you might find that a shorter-stocked gun is much easier to mount. A good solution is to adjust your stock or have it cut to the right length for hunting in winter clothing. You can always use a slip-on recoil pad for early-season teal or other shirtsleeve-weather hunts.
TIPS FOR CHOKES AND LOADS
Quick Fix #5: Mix Loads for Maximum Results
You can get some of the benefits of a double gun, with its two chokes, by first chambering a shell with an open pattern followed by two tight-patterning loads. Winchester Blind Side and Xpert as well as Federal Black Cloud Close Range tend to open up faster than many other steel loads. Load one of those, then follow it with two standard premium steel cartridges in a larger shot size.
Quick Fix #6: Compensate for the Cold
The increased resistance of dense, cold air slows pellets and opens patterns. You might lose up to 75 fps of velocity and shoot patterns that are 10 percent wider late in the season, when temperatures drop. You can compensate for this by selecting shot that's one size larger than the pellets in your regular load and then tightening your choke. Cold air affects larger pellets less than it does smaller ones.
Quick Fix #7: Choose an All-Around Pellet
Steel 2s come as close as anything to an all-purpose pellet for waterfowl. They shoot patterns that are dense enough for close-range teal and yet sufficiently powerful to bag decoying geese. If I had to choose just one load for all waterfowl, it would be 1 1/4 ounces of size 2 shot at 1,450 to 1,500 fps. Take geese out of the equation and I'd go with 3s as a good all-around pellet.
Quick Fix #8: Use Swatter Loads for Cripples
You can use up a lot of ammunition trying to hit a crippled duck or goose in the head. Steel 6s give you greater pattern density for hitting birds in that small, vital area. Shoot a little low at swimming cripples so you don't waste the top half of the pattern. I also keep a bunch of 2s or 4s in my pocket for dispatching crippled geese in dry fields.
Quick Fix #9: Open Your Chokes
Most waterfowl gunners are over-choked. You don't need tight patterns at 40 yards if you shoot your birds over decoys at 25. Improved-cylinder or light-modified chokes work very well at decoying ranges. When you choose chokes, pattern your gun for the distance at which you expect to take most of your shots. Look for a pattern that puts 75 to 80 percent of its pellets in a 30-inch circle at that range, with good coverage out to the pattern's edges.
TIPS FOR TECHNIQUE
Quick Fix #10: Practice at home
The most essential skill in field shooting is a good gun mount. Learning to bring the gun to your face smoothly and consistently helps you shoot instinctively, without conscious effort. Practice your gun mount at home with an unloaded gun. Concentrate on bringing the gun to your face first, then tucking the butt into your shoulder. Repeat this same gun-mounting routine while wearing your cold-weather waterfowling clothes, so you learn to push the gun out and away from your body to keep it from snagging on all those layers.
Quick Fix #11: Match the Target's Speed
Moving the gun muzzle too fast destroys your "feel" for the target and attracts your eye to the bead, which stops the gun. If you start the muzzle in front of the bird, match the bird's speed. However, swing-through shooters should think of moving the gun about 1 mph faster than the bird as they move the barrel through the target. On high passing shots you have to really slow down. Move the gun at half the speed you think you should.
Quick Fix #12: Point Below the Target
Keeping the muzzle below the target allows you to see the bird clearly. That's important, because blocking your view of the target with the muzzle makes you look at the gun, causing you to miss high and behind—the most common way to whiff in shotgunning. The only time you need to cover the bird with the gun is when ducks jump out of the decoys or when you have an overhead shot.
Quick Fix #13: Take Your Time
Shooting ducks isn't a fast-draw competition. Rushing the shot only increases the chance of a bad gun mount. See the target and move the gun to it slowly. You have more time than you think.
Quick Fix #14: Keep the Gun in Front
The easiest way to make a crossing shot is to never let the bird pass your gun muzzle. Keeping the gun in front of the target will make the bird seem to fly slower, because you won't feel the need to rush to catch up. If your eyes stay on the target, your gun becomes a blur in your peripheral vision as the barrel remains out front.
Quick Fix #15: Focus on the Bird
The more precisely you focus on the target, the better your hands know where to put the gun. If you look in the general direction of a duck, that's what you hit. When you're having a bad day, take the time to narrow your focus to the bird's bill or eyes and the gun will go where it has to.
TIPS FOR A GOOD MINDSET
Quick Fix #16: Talk to Yourself
If you get excited when birds come in, use self-talk. Borrow a technique from target shooters and keep your thoughts performance-oriented. For example, think about what you need to do—such as pick a bird or move the gun slowly—in order to make a successful shot.
Quick Fix #17: Stay Positive
Slumps happen, and they tend to get worse when your thoughts turn negative. Once you start thinking I'm a terrible shot; I never hit anything, a slump can become harder to break. Think only about what you can control—the next shot. When you miss a bird, think about why you missed it and move on. When you hit one, shooting will begin to feel like the easiest thing in the world and the slump will end.
Quick Fix #18: Read a Golf Book
Reading a book about golf psychology can help you handle the mental challenges of shotgunning, even if you don't play golf. The similarities between the two sports are remarkable; they go far beyond keeping your head down and your eye on the target. One of my favorite golf books for getting into a good shooting mindset is Zen Putting by Dr. Joe Parent.
Quick Fix #19: Avoid Mental Blocks
Although it's important to have confidence in your equipment, don't get stuck on a particular brand of shotshell, a specific velocity, or a certain pellet size. If you do, you'll be off your game the first day you have to shoot something else.
Quick Fix #20: Visualize the Shot
Visualization is a lot like daydreaming, which is how most of us get through the off-season anyway. When you visualize, you are actually training your mind. See yourself shooting successfully. The more completely you can imagine the situation—the cold, the wind, the sights and sounds—the better. Picture yourself doing the things you need to do to be successful, and this positive outlook will carry over into your shooting.
TIPS FOR BETTER SHOTS
Quick Fix #21: Help Yourself Up
When hunting in a layout blind, some hunters will dig a shallow depression beneath their seat so they're already partially sitting up in shooting position. Others will dig below the foot of the layout to gain the leverage needed to sit up more easily. Either one of these tactics will help make it easier to sit up and shoot in a layout blind.
Quick Fix #22: Cover Your Face
Wear a face mask or paint. Dimming the shine of your face could give you a slightly bigger window of opportunity to keep your head up as the birds come in. It's much easier to shoot if you don't have to look up suddenly and try to find a target when someone calls the shot.
Quick Fix #23: Keep Your Hands Warm
Shooting with numb fingers can be challenging. Chemical hand warmers are great, just as long as you can keep them dry. However, rechargeable devices such as ThermaCell hand warmers and Flambeau heated hand muffs will keep your hands warm even in wet weather. Taking along extra pairs of gloves also helps.
Quick Fix #24: Have a Clear View
Pulling the bill of your cap down too low on your face can make it difficult to see the target and potentially cause you to lift your head off the gun. Tip back the bill of your cap or turn it around, and you'll see better and have an easier time keeping your head down as you mount the gun.
Another way to improve your ability to see waterfowl is to leave your shades at home. Sunglasses can help cut down glare if you're looking into bright sunlight, but dark lenses make it hard to see ducks and geese. Instead of sunglasses, wear shooting glasses—and choose the lightest tint you can use without squinting. You'll see targets better that way.
Quick Fix #25: Set Your Feet
Being able to move your feet when you're standing in the water is often a luxury. Usually you have to shoot with your feet stuck in the mud. If that's the case, set them so you are facing slightly to the right (if you're right-handed) of where you expect to shoot. It's much easier to swing to your left without binding up than to your right.
Organized coyote hunts are now targets,
but so far not in Pennsylvania
by Jeff Mulhollem
(Photo by Alan Emery/Unsplash)
As I put the finishing touches on this blog, a news story just aired about two attacks by coyotes in Chicago, one victim a child; the other an elderly man. One wonders how those kind of incidents — which are growing more common — will affect peoples’ opinions on the following …
A bit of research has revealed that organized coyote hunts are held in at least 45 states, but Pennsylvania — with at least 30 organized predator hunts this winter — has more than any other state. Paradoxically, unlike many other states, we have experienced very little controversy related to organized coyote hunts. But that may be about to change.
With 12 hunts planned this month, 17 slated in February and one scheduled in early March, we are all about organized coyote hunting here. All of those events are held by sportsmen’s and municipal groups as fundraisers.
The highlight of Pennsylvania’s organized coyote hunts, of course, is the Mosquito Creek Sportsmen’s contest Feb. 21-23, which is the largest coyote hunt in the United States.
Although there has been no recent criticism of the organized hunts here, the Massachusetts Fisheries and Wildlife Board recently voted to ban coyote-hunting contests. That ban will prohibit hunting contests for “predators and furbearers,” which includes coyotes, bobcats, red foxes, gray foxes, weasels, minks, skunks, river otters, muskrats, beavers, fishers, raccoons and opossums.
On its website, the state agency, dubbed “MassWildlife,” wrote that the new rule “addresses public concerns that these hunting contests are unethical, contribute to the waste of animals and incentivize indiscriminate killing of wildlife.”
Interestingly, Massachusetts’ new rules also ban the “wanton waste” of birds and game animals that are legally killed during hunting seasons. That means a hunter cannot “intentionally or knowingly leave a wounded or dead animal or bird in the field or the forest without making a reasonable effort to retrieve and use it.”
California, Arizona, Vermont and New Mexico have similar bans in place, and lawmakers in New Jersey, New York and Oregon are reportedly considering some form of ban. Their efforts are responses to organized coyote hunts drawing protests from animal rights activists, who call the contests “barbaric and wasteful killing of treasured wildlife.”
The “treasured wildlife” concept will be difficult to attach to coyotes in Pennsylvania with our super strong deer-hunting heritage, given that coyotes kill many thousands of fawns here each spring. And there seems to be endless hordes of coyotes here.
Still, even among hunter ranks, a distaste for organized coyote hunts is growing.in other states. When Arizona banned coyote hunting contests, the chairman of the Arizona Game and Fish Commission said they weren’t “painting the right picture of what ethical hunting and fair chase is all about.”
8 Bowhunting Accuracy Mistakes to Avoid
Nothing will ruin your moment-of-truth bowhunting encounter faster than these eight cardinal sins.
Of all places, I was hunting from inside a powerless and somewhat-dilapidated abandoned homestead. The setting sun’s final glints illuminated the sparse trees dotting what was otherwise wide-open landscape. Deer, lots of them, meandered here and there — most were feeding, but several bucks were afflicted with mid-December rut brain. At that point in my life, it was the most incredible evening of whitetail hunting I’d ever experienced.
At least 50 deer surrounded me. Of them, three bucks were worthy of my 10-hour drive to North Dakota from Wisconsin. One particular 9-pointer, sporting a forked G2, caught my eye as he sparred with a subordinate buck. Following the gentle match, he headed my way. My heart pounded.
Soon, I was looking through my peep sight at my then-biggest buck. My top pin froze on his midsection; I couldn’t seem to push it closer to the shoulder. Then, against my will, my thumb crushed the trigger.
Instantly, my heart sank. Not only had my pin been placed too far back, but my bowstring also slapped my bulky sleeve, worsening the poorly executed shot. I’d failed on so many levels and botched a 9-yard gimme.
An anxious wreck, I left the buck overnight. Fortunately, I recovered him the following morning less than 200 yards away. However, that didn’t fix my mistakes. Plain and simple — I had work to do.
If my story resembles one you’ve recently experienced, you’ve landed in the right place. Let’s identify and confront eight mistakes that could be robbing your bowhunting accuracy. As we do, please understand that some take months of hard work and practice to overcome, while others require focus and discipline at the critical moment-of-truth. Let’s dive in.
You won’t shoot well if you have an inconsistent anchor point. A kisser or nose button can help you anchor in the same place every time.
Mistake 1: Inconsistent Anchor Point
If you’ve mastered an anchor point while shooting your backyard deer target, great. Now, see if that consistent anchor point duplicates when you shoot your deer target from a treestand or similarly elevated platform and while wearing hunting garb. If you find it uncomfortable or difficult to hit your familiar anchor point, your form has changed due to the elevated angle.
Commonly, average bowhunters raise or lower their bow arm to acquire an inclined or declined target. This makes it nearly impossible to reach the same anchor point you developed while shooting on flat ground. And, when your anchor point changes, you’ll look through your peep sight differently. What happens next? Accuracy suffers. Add adrenaline and a heavy hunting jacket to the mix, and you’re practically promoting failure.
Fixing this mistake is easy. First, draw back as if you’re shooting on level ground. Once you reach your familiar anchor point and line up your sight housing inside your peep sight, bend forward at the waist rather than dropping your bow arm. Finding your anchor point prior to acquiring a target at a declined or inclined angle is critical.
Inevitably, some folks might still struggle to anchor consistently, perhaps even when shooting on level ground. If that’s you, have a kisser or nose button installed on your bowstring. Supplementing your peep sight with a second reference point will help you maintain a common anchor point, even when shooting from awkward positions.
Mistake 2: The Death Clench
How you grip and hold the bow influences accuracy greatly. I cannot count how many bowhunters I’ve watched put too much hand on the bow grip. I call it “the death clench.” This mistake produces minor to severe torque. In other words, the bowstring aligns left or right of the cam track. In turn, arrows leave the bow inconsistently.
Properly gripping a bow is a process that begins before you even purchase one. When shopping, examine the grip’s fit and feel on each bow of interest. If anything about a grip feels foreign, eliminate that bow. Be attentive to your individual preferences, and only buy a bow that feels like it’s meant for your hand. Believe me; a bow with an awkward grip will disappoint you, regardless of the brand.
Suppose you already own a bow with an uncomfortable grip. You have three options: 1) sell the bow and buy a different one, 2) purchase a more comfortable after-market grip and install it on the bow or 3) remove the existing grip and grip the riser directly. Choose any of these options, and your consistency will improve noticeably.
Next, it’s important to hold the grip correctly. Everyone grips their bow a bit differently. I shoot best with a low-wrist grip, my hand cocked back and the palm portion of my thumb making the only hand contact with the grip. I don’t wrap my fingers around the grip. In a sense, I’m not really “gripping” the bow because my hand doesn’t close around it.
If you find this uncomfortable, it could be that you’ve been gripping incorrectly for such a long time that anything else feels wrong. It might take time and practice to adopt the new grip. Or, it’s possible that you’ll need to experiment with a few different positions to find one that works for you. As you do, remember: the more hand contact, the more likely you’ll torque the bow.
When gripping the bow, the less you involve your hand, the better. Bow torque — twisting the grip right or left, or up and down — will crush your accuracy.
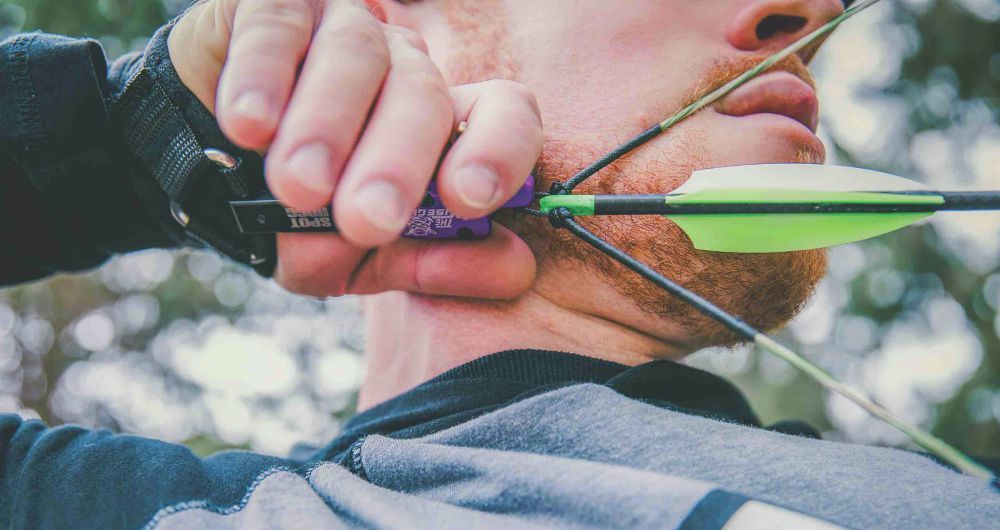
Mistake 3: Bowstring Contact
Hunting in cold weather means dressing in thick, well-insulated apparel. If your sleeves have excessive fabric, it can interfere with the bowstring path. Unwanted contact can send your arrow off course, causing a marginal hit or miss.
Identify this potential dilemma before you hunt by practicing in your hunting clothes. If you experience any sleeve-to-bowstring contact, fix the problem immediately with one of these solutions: 1) purchase an arm-guard that shrinks sleeve bulk tighter to your forearm or 2) purchase a more form-fitting jacket.
If the issue persists, it’s quite possible that your draw length is too long. In that case, you might need to have your bow re-fitted, if adjustable. If it isn’t, the next step is to obtain a different bow that can be adjusted to fit you.
One final note. Speed bows with short brace heights (5 to 6 inches) are more likely to slap your sleeve than bows with a more forgiving brace height of, say, 7 inches. Today, most bows, even speed bows, are outfitted with some type of string stop or suppression system. These are designed to prevent the string from oscillating past the brace height, which reduces the likelihood of sleeve contact. If your current bow doesn’t have one, consider purchasing an aftermarket string stop.
Mistake 4: Too Much Draw Weight
Think you’re a macho man or woman; think again. Frigid temperatures, stiff muscles and awkward shots all make your bow difficult to draw. Even a slight struggle to draw back can cause torque or change your shooting form and technique. Set your bow to a comfortable draw weight that you can pull easily when it’s cold or you’re ridden with adrenaline. A low-poundage bow that you can shoot accurately is deadlier than a high-poundage bow that you can barely draw.
Mistake 5: Punching the Trigger
Punching your release aid is not conducive to proper aiming and natural follow-through. Everything about a shot sequence must be natural. I’ve certainly seen the negative results of a rushed shot ending with a trigger punch.
One example is an elk I missed in Idaho. I was soaked from rainfall and cold to the core. I’d been shadowing two bugling bulls until mid-morning when the larger one pushed the satellite bull away from his herd. Bingo! The large satellite offered a 30-yard broadside shot, but my shivering body struggled to hold the pin steady, and I rushed the shot. Worse, as I punched the trigger, my arm anticipated the shot and it reacted prematurely. Yes, I flinched. The bull fled, unscathed fortunately.
If you punch the trigger in the backyard, you’ll punch it when hunting. Hunting situations elevate adrenaline, causing the sense of urgency to shoot to strike. In other words, the voice in your head is causing the incorrect response. Conquer trigger punch on the range first, or it will worsen under the pressures of the hunt. Furthermore, that voice will probably always be there when your pin meets hide, even if you’ve overcome trigger punching. Tune it out by focusing on your new routine for making perfect shots on any/every target.
Mistake 6: Forsaking Broadhead Practice
A decade ago, while visiting with Hoyt sales representative, Matt True — a successful bowhunter — at my family’s archery shop, we discussed mistakes that keep bowhunters from making good shots while hunting.
“Too many folks assume their broadheads will shoot exactly like field points,” True suggested, “but they rarely do. In this case, equipment may legitimately be the blame for a miss or poor hit. But, it’s still an oversight by the bowhunter, and avoidable. Designate a couple of broadheads for practice and check their accuracy before you hunt,” he suggested.
Personally, I don’t hunt with a broadhead until I’ve shot it at a target and found that it groups the same as my practice arrows. I often find flight variances; correcting the problem is usually as simple as tweaking my bow or pairing the broadhead with a different arrow from my quiver. The extra effort is always worth it. I hunt knowing — not wondering if — my broadhead-tipped arrows will hit where my pin aims.
The problem won’t always solve so easily, though. If you bought cheap broadheads, the ferrules could be crooked. Or, your arrows could be worn out or have poor straightness tolerances. In these cases, no amount of bow tinkering or arrow swaps will fix the issue. Buy high-quality broadheads with steel ferrules or straighter arrows.
Mistake 7: The Mental Meltdown
All of your preparations can build your confidence for the main event. But, if the only time you shoot under pressure is when a buck pauses in your shooting lane, it’s possible to botch even a slam-dunk shot. Pressure can go to your head and affect your ability to think clearly in a step-by-step manner like you do (or at least should do) while practicing.
Do you think this only happens to beginners or those who don’t practice enough? Think again. While interviewing Randy Ulmer for a “Pros Talk 3-D Archery” article, Ulmer shared that meltdowns can happen to anyone faced with a big shot opportunity. He conceded that imposing pressure while shooting is the only way to prepare for a real encounter.
“Most bowhunters have meltdowns when they’re about to shoot at an animal,” Ulmer said. “I hate to admit it, but it happens to me, too. Some folks suggest ignoring these emotions, but I find that you can’t lie to yourself. What helps me most is that I admit, yes, I’m scared to death, and, yes, my bow will shake. So, I resolve to make the very best shot possible under those circumstances. I find that if I have perfect form, even if my pin is moving, my arrow usually will hit in the center of that movement pattern.”
“Unfortunately, you can’t easily replicate this,” he continued. “Shooting competitive 3-D archery, even if it’s betting your buddy a buck-a-shot, is the only way to simulate those effects. Having experienced both, the rush of shooting competitively is so similar to shooting at a trophy animal. The only real differences are that, with an animal, you must determine if you have an ethical shot, and you must study the animal’s demeanor to determine when to shoot.”
Mistake 8: Attempting a Low-Percentage Shot
During our decade-old conversation, True shared another common bowhunting mistake.
“Tree limbs, misjudged distances and poor shot angles all become factors when hunters force shots,” he said. “When an animal you want to harvest comes within range, the temptation to shoot can be overwhelming. But, if a tree limb obstructs the vitals or the animal doesn’t present a high-percentage opportunity, letting it walk away could be your best chance to harvest it another day. If you miss or make a poor hit due to forcing a shot, it’s possible you’ll never see it again.”
I don’t care how much you’ve practiced; taking a bad, low-percentage shot is impermissible. In fact, it’s downright unethical and portrays a poor image for hunters and the hunting community. Take only shots you know you can make. It’s your responsibility.
This 90-yard group is the author’s personal best, but it doesn’t mean he attempts stupid shots in the field just because he did it on the range.
Final Words
Mental management and equipment operation literally become second nature when you practice and prepare, persistently. People who don’t prepare in mind, body and equipment lack the confidence to shoot well under pressure. They make mistakes. They miss. And it sucks.
I’ve found that I consistently make better shots on game by avoiding the mistakes I’ve outlined in this article. You can, too. Remember these eight costly mistakes and prepare for them so they don’t bridle your shooting accuracy the next time you are faced with a tough bowhunting shot.