Survival Skills: How to Make Deadfall Traps
Learn how to set three different styles of deadfall traps for a survival situation
BY CRAIG CAUDILL

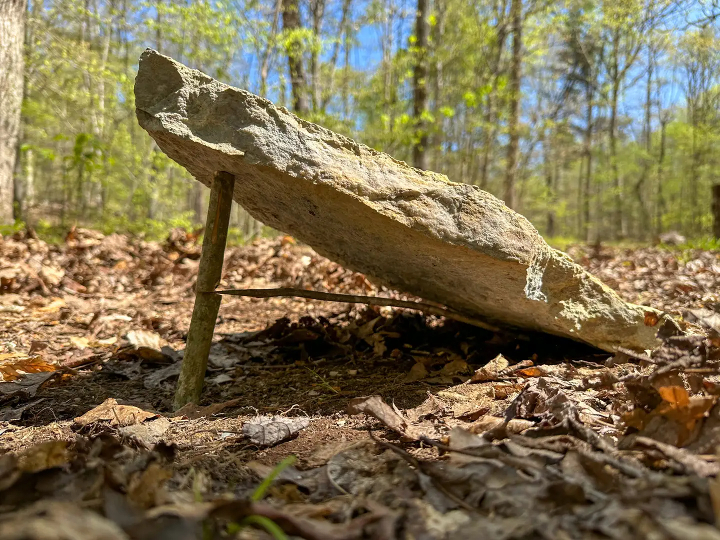
Trapping is a vital skill for survival and sustainable living in the wilderness. Among the various traps, deadfall traps stand out for their effectiveness and simplicity. These traps use the weight of a heavy object to dispatch prey quickly and humanely. This article will explore three popular deadfall traps: the Split Stick Figure 4 Trap, the Paiute Deadfall Trap, and the Split Stick Deadfall Trap. Each type has its unique build and application, tailored to different environments and target species.
1) The Split Stick Figure 4 Trap
The Split Stick Figure 4 Trap is a precision-engineered variant of the classic Figure 4 trap. It’s designed for reliability and sensitivity, using a split stick configuration to enhance the ease of carving this trap. After teaching many people how to do a regular Figure 4 trap, a friend showed me this split-stick variation. Carving this one, especially for beginners, is much easier and equally effective.

Materials Needed:
A heavy, flat rock or log will serve as the portion that falls prey in the trap. This can be small for small prey like small rodents, or much larger for mid-size game animals.
Find a stick about twice the length of your rock or log and a large enough diameter to hold the weight.
A good bushcraft-style knife for carving carve it.
Split Stick Figure 4 Trap: Step-by-Step Instructions
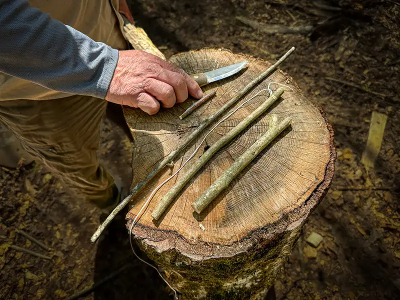
Step 1: Choose a straight stick without too many knots. It should be about twice the length of your deadfall portion. Cut a piece slightly taller than the animal you expect to catch in the trap and split it into two equally thick parts. Those will be Sticks 1 and 2.
Stick 1 (Vertical Post): Carve one end into a flat, sharp edge. This is often called a “shovel” point because it can be used on giant sticks as a digging tool.
Stick 2 (Angled Stick): Carve shovels on both ends of this stick and a 7-notch 1/3 of the way down one end.
Stick 3 (Trigger Stick): Carve a 7-notch at one end to fit into Stick 2, cut a 90-degree L-shaped notch to match the vertical post, and a point at the other that will hold the bait.
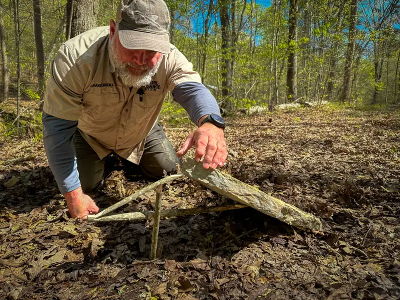
Step 2: Assemble the trap. Position Stick 1 vertically on the ground. Place Stick 2 with the flat end resting beneath the deadfall rock and the notched end catching the sharp edge of Stick 1. Insert the notched end of Stick 3 into the notch of Stick 2, ensuring it is secure and sensitive to touch.
Step 3: Set the trap. Place your bait on the pointed end of Stick 3. Bait for traps should always attract the animal you want to attract. General baiting is only minimally sufficient here. Gently set your rock or log on top, balanced precariously by the interconnected sticks.
Step 4: Test the trap. Tap the bait stick lightly to ensure the trap disengages easily and the rock falls promptly.
2) The Paiute Deadfall Trap
The Paiute Deadfall Trap, which originates from the indigenous Paiute tribes of North America, uses a susceptible trigger mechanism, making it ideal for more minor game-like rodents.

Materials Need:
A flat, heavy rock or log large enough to bear the weight of your deadfall
A length of cordage about twice the length of your deadfall
A smaller-diameter stick the length of your deadfall
The best bushcraft knife you have for carving.

Paiute Deadfall Trap: Step-by-Step Instructions
Step 1: Prepare your materials.
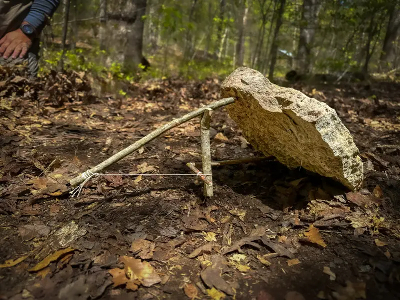
Stick 1 is the vertical post will be flat on the bottom and use branches as a “Y” at the top.
Stick 2, the angled stick, will be flat on both ends. I carved a notch on the end to securely hold the cordage on the stick.
Stick 3 is the small trigger that will be attached last with cordage.
Step 2: Assemble the trigger system. Attach the cordage loop to the notched end of the vertical stick. Thread the other end of the cordage through the notch of the horizontal stick and tie it to the small trigger twig.
Step 3: Set the trap. Place the vertical stick under your deadfall, ensuring it stands firm. Balance the horizontal bait against the vertical stick, securing the cordage to be taut. Place the trigger twig perpendicular to the horizontal bait stick with the bait attached.
Step 4: Fine-tune and test. Adjust the tension in the cordage to ensure the trap is sensitive yet stable. Test the mechanism by gently touching the trigger twig to ensure the rock falls smoothly.
3) The Split Stick Deadfall Trap

This trap is a simplified version of the Split Stick Figure 4, using fewer components and a more straightforward setup. It is ideal for quick survival situations.
Materials Needed
A large, heavy rock or log
One stick that is thick enough to hold the weight of your deadfall trap.
A thin stick is to be used as a bait stick.
A knife for carving
Step 1: Carve your sticks. Split your thick stick into two equal pieces. Ensure the cut is at a 90-degree angle to the stick. Cut one of your trigger sticks to a skinny thickness. Make sure it is not at an angle. The other should be equal in thickness.
Step 2: Set up the trap. Lay one stick flat on the ground and place the other on top, ensuring the two ends match securely. Place the thin carved stick between the two upright pieces.
Step 3: Place the deadfall. Set your rock or log on the sticks’ interlocking point, ensuring it’s unstable enough to fall at a slight touch. You can easily place another flat rock on the ground to ensure this (and the other) deadfall trap kills the animal quickly.
Step 4: Bait and test the trap. Attach bait to the bait stick, ensuring it’s enticing and easy to access. Test the stability and sensitivity of the setup by gently prodding the bait stick.
Other Things to Consider for Survival Traps
Where to Set Traps and How to Bait Them
Building the trap is one-third of the process of building deadfalls. The second part involves proper placement along known or likely game trails or wildlife corridors. That last part is bait. In general, animals are attracted to the smells of the food they prefer and to the scat or hair of other animals. They will investigate to determine what the other animals are doing. You can also purchase or gather attractants from trapping suppliers, including urine and other scent attractants.
Legal Considerations
Before setting up any primitive snares or traps, it’s crucial to understand the local regulations. In many regions, such practices are strictly regulated or even prohibited. Always ensure you have the appropriate permissions, like a hunting license, to avoid legal issues. Check with your local wildlife management authority to understand your area’s rules and regulations.
Regional Restrictions
Some regions have specific prohibitions against certain types of traps and methods. For instance, it’s illegal to use pits, pitfalls, nets, poison, and certain types of mechanical traps. Before planning your trap setup, always verify whether specific methods are allowed in your locale.
Whether you want to hone your wilderness survival skills or engage in a challenging outdoor activity, building a non-lethal deadfall trap offers both. You can enjoy this practice responsibly by respecting local wildlife regulations and adapting traditional trapping techniques to modern ethical standards. Always aim for humane methods that minimize animal harm while allowing you to develop essential survival techniques.


