Another school of thought about what causes chronic wasting disease in deer
By Jeff Mulhollem
A lot of what you have heard and read about the cause of chronic wasting disease is in doubt – or maybe not. It depends on which scientists you believe. Seems there is and has been a controversy brewing on the subject for years. Who knew?
The controversy centers around prions, those mysterious non-bacteria, non-virus particles that we have been told for years somehow cause the disease. (Teddy Roosevelt Partnership)
The controversy centers around prions, those mysterious non-bacteria, non-virus particles that we have been told for years somehow cause the disease.
They were discovered in 1982 by neurologist Dr. Stanley Prusiner. He suggested that those “misfolded proteins” cause transmissible spongiform encephalopathies – brain diseases like chronic wasting disease, mad cow and sheep scrapie. Prusiner won a Nobel Prize for his achievement, setting off a flurry of prion-based research.
Today, 99 percent of scientists believe prions cause CWD. That’s why we haven’t heard about the alternate theory until now. And maybe they are right, I can’t say. But you should know that there is another school of thought about what causes chronic wasting disease in deer.
A few scientists are conducting alternative research. The most prominent is Dr. Frank Bastian, a pathologist at Louisiana State University. He argues that a unique super-bacteria known as spiroplasma causes transmissible spongiform encephalopathies such as CWD.
He has been saying that for a long time. Way back in 2007, Bastian injected strains of spiroplasma into laboratory deer, sheep and goats. Some of the animals showed clinical signs of disease in just 1.5 months. One deer reportedly contracted CWD in 3.5 months, and all deer tested CWD positive in 5.5 months.
Bastian believes that prions are just a marker for diseases like CWD. Most recently, in 2017, Bastian published findings in the Journal of Neuropathology and Experimental Neurology, (a respected journal), where he was able to isolate spiroplasma from the brains and lymph nodes of CWD-infected deer.
What this means, we’re told, is that Bastian is now able to grow spiroplasma in a lab, which can have enormous ramifications for better understanding and managing CWD in the wild.
“We can now test susceptibility to drugs, and produce a killed organism to produce a vaccine that can be given to animals,” Bastian was quoted as saying on the Deer and Deer Hunting website last July. Bastian’s research, some say, may also lead to a test kit that hunters can use in the field right after harvesting a deer to determine if it has CWD.
To that end, leaders of the Unified Sportsmen of Pennsylvania report that they have entered into an agreement with LSU to support Dr. Bastian’s work. They say Unified will provide an undisclosed amount of grant funding to LSU to help pay for him to continue and complete his chronic wasting disease research.
In return, they say, LSU will provide the organization with “first stage diagnostic tests” for Pennsylvania hunters to test deer in the field after harvest for chronic wasting disease infection. Will other sportsmen’s groups around the country follow Unified’s lead?
It will be interesting to watch how the Pennsylvania Game Commission, other state wildlife management agencies, the U.S. Fish and Wildlife Service and the scientific community in general react to this promotion of the alternate theory about CWD being caused by super bacteria and not prions.
So far, apparently, they have carefully ignored it. But with so little progress being made in reining in the disease steadily spreading through North America deer and elk herds, perhaps it is time for a fresh look at the culprit spreading CWD.
Five Classic Waterfowl Recipes
The Sporting Chef offers new variations on traditional duck and goose dishes

Photo © Woody Woodliff
8 MIN READ
By Scott Leysath
Photography by Woody Woodliff
Classic recipes aren't necessarily dishes that most people have actually had the opportunity to enjoy, but they do have a very traditional ring to them. There's boeuf bourguignon, duck á l'orange, lobster thermidor, and pheasant under glass, which simply involves serving a sautéed pheasant breast under a glass lid that captures the aromatic essence of the dish. Classic doesn't always mean fine dining, but the next time you serve your favorite duck dish, you might want to place a glass bowl over the plate and call it "duck under glass" to impress your guests.
Traditional waterfowl recipes are often less hoity-toity. Roasted wild goose has been a popular dish for generations, and so too has duck gumbo. Simple, hearty meals were probably the norm at the time of DU's formation, when some ingredients were hard to come by and a dollar had to be stretched during the hardscrabble days of the Great Depression. It's not difficult, however, to imagine Joseph Knapp and some of the other well-heeled founders of DU dining on teal á l'orange and similar wild duck haute cuisine.
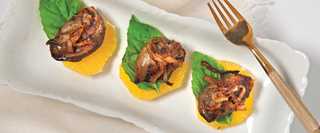
Photo © Woody Woodliff
RECIPE ONE: TEAL Á L'ORANGE
Teal rank at the top of many lists of best-eating ducks. These diminutive fast fliers are one of the few ducks that can be cooked whole rather than in parts. However, this twist on a classic recipe features teal breast fillets over orange slices and basil leaves.
Cooking Time: 25–30 minutes
Serves: 4
Ingredients
- 12 teal breast fillets, preferably with skin intact
- Kosher salt and freshly ground pepper
- 1/2 cup chilled butter, cut into small pieces
- 1/4 cup orange liqueur
- 12 orange slices
- 12 basil leaves
Marinade
- 3 tablespoons orange juice concentrate
- 1/4 cup sugar
- 1 cup dry white wine
- 1/4 cup cider vinegar
- 2 tablespoons orange marmalade
- 3 tablespoons olive oil
Directions
Step 1 Season the teal breast fillets liberally with salt and pepper. Combine the marinade ingredients and whisk to blend. Place the teal and marinade in a resealable plastic bag. Toss to coat evenly and place in the refrigerator for 6 to 12 hours. Remove the teal from the marinade and pat dry.
Step 2 Heat 1/4 cup of the butter in a large skillet over medium-high heat. Place the teal fillets in the skillet, skin side down, and cook them until the skin is lightly browned and crisp, about 3 minutes. Flip them over and cook the other side for 2 minutes for medium-rare—or longer to desired doneness. Remove the teal and keep them warm.
Step 3 Remove the skillet from the heat and set it away from any open flame. Slowly add orange liqueur to the skillet, but use caution—adding alcohol to a hot skillet may cause it to ignite. Please keep yourself and anything flammable away from the skillet, adding the liquid slowly and carefully.
Step 4 Place the skillet over medium heat and reduce the liquid by half. Remove from the heat and whisk in remaining butter until smooth. To serve, arrange 3 orange slices and 3 basil leaves on each plate, then top with teal fillets, pan sauce, and caramelized onions.
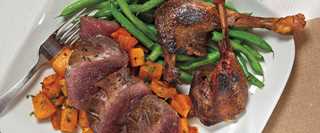
Photo © Woody Woodliff
RECIPE TWO: ROASTED WILD GOOSE
The classic picture of a plump goose on a roasting platter, flanked by roasted fruits and vegetables, undoubtedly depicts a farm-raised bird. However, roasting a wild goose whole will result in parts that are edible and others that are less so. This recipe solves that dilemma by giving the legs a head start in a tenderizing broth.
Cooking Time: 2 1/2–3 hours
Serves: 4
Ingredients
- 2 goose breast fillets, skin intact
- 2 or more goose legs
- Kosher salt and freshly ground pepper
- Olive oil
- Beef, chicken, or game broth
- 1/2 cup dry red wine
- 2 cloves garlic, minced
- 3 tablespoons chilled butter, cut into pieces
Directions
Step 1 Rub the goose legs and breast fillets on all sides with salt and pepper. Wrap the breast fillets in plastic wrap and place them in the refrigerator.
Step 2 Preheat the oven to 350°F. Add a thin layer of olive oil to an ovenproof skillet over medium heat. Place the goose legs in the skillet and brown evenly on all sides. Add about 1 inch of broth and bring to a boil. Remove the skillet from the heat and cover with a lid or foil. Place the skillet in the preheated oven, then check for doneness after 2 hours. The meat on the legs should have receded to the joint and should pull away from the bone with moderate pressure. If more cooking time is needed, add additional broth to the skillet, replace the lid or foil, and continue cooking until the meat is tender. Remove from the oven, transfer to a plate or pan, and keep warm.
Step 3 Increase oven heat to 400°F. Rinse and dry the ovenproof skillet (or use another one), add a thin layer of olive oil, and heat the oil over medium-high heat. Place the goose breast fillets, skin side down, in the skillet and cook until the skin is lightly browned and crispy. Flip over, add red wine, and stir to deglaze any bits stuck to the pan. Add reserved legs and garlic, stir, then place the pan uncovered in the preheated oven for about 4 to 5 minutes for medium-rare—or longer to desired doneness.
Step 4 Allow the breast fillets to rest for a few minutes before slicing and arranging them on plates with the legs. Whisk the butter into the skillet and spoon the pan sauce over the sliced goose.
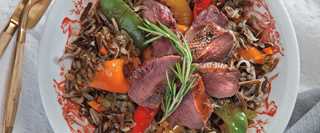
Photo © Woody Woodliff
RECIPE THREE: PAN-SEARED DUCK BREAST WITH WILD RICE
This simple recipe is a variation on the traditional pairing of ducks with wild rice. While stuffing wild ducks can lead to overcooking, this dish turns duck breast fillets into tender, mouthwatering morsels. The secret is to brine the fillets first, then pan-sear them quickly on high heat.
Cooking Time: 20–25 minutes
Serves: 4
Ingredients
- 4 to 6 medium to large duck breast fillets, skin on or off
- Olive oil
Brine
- 1 quart ice-cold water
- 1/4 cup kosher salt
- 3 tablespoons crushed peppercorns
- 2 bay leaves, crushed
- 1/4 cup brown sugar
- 3 cloves garlic, minced
- 2 or 3 sprigs fresh rosemary
Directions
Step 1 Heat 1 cup of the ice-cold water in a saucepan over medium heat. Add remaining brine ingredients—except water—and bring to a boil. Reduce heat to low and stir until salt is dissolved. Allow to cool completely. Add remaining ice-cold water. Place the duck breast fillets in brine and refrigerate for 12 hours. Remove from brine and pat dry.
Step 2 Heat a thin layer of oil in a medium-hot skillet. Brown the duck breast fillets evenly on both sides. Allow to rest for 2 to 3 minutes, then slice and serve over wild rice and roasted bell peppers.

Photo © Woody Woodliff
RECIPE FOUR: MARINATED DUCK LETTUCE WRAPS
This easy dish is a tribute to Peking duck, which typically requires a few days to prepare. If more pronounced flavor is desired, allow the duck fillets to marinate for up to 24 hours.
Cooking Time: 15–20 minutes
Serves: 4
Ingredients
- 4 to 6 medium to large duck breast fillets, skin on or off
- 2 tablespoons vegetable oil
Hoisin sauce
- Iceberg lettuce leaves, trimmed
- Shredded carrots
- Julienned green onions
- Sriracha or other hot sauce
Marinade
- 1/3 cup low-sodium soy sauce
- 2 teaspoons sesame oil
- 3 tablespoons rice vinegar
- 2 tablespoons brown sugar
- 1 teaspoon fresh ginger, peeled and minced
- 2 cloves garlic, minced
- Pinch or two of five-spice powder
Directions
Step 1 Combine marinade ingredients and whisk to blend. Place duck breast fillets and marinade in a non-reactive bowl or resealable plastic bag. Toss to coat evenly and place in the refrigerator for 6 to 12 hours. Remove duck breast fillets from marinade and pat dry.
Step 2 Heat the vegetable oil in a large skillet over medium-high heat. If the skin is intact, place the fillets skin side down and cook until skin is crispy. Once browned, flip them over and cook until the other side is medium brown but not overcooked.
Step 3 Once cooked, place duck breast fillets on a cutting surface and allow them to rest for a few minutes before slicing them thinly across the "grain." Spread a thin layer of hoisin sauce on the lettuce leaves and top with duck, carrots, onions, and Sriracha as desired. Fold the lettuce leaves over and eat with your hands like a taco or burrito.

Photo © Woody Woodliff
RECIPE FIVE: DUCK GUMBO
This classic Louisiana stew is a common menu item in bayou duck camps. There are perhaps more versions of this recipe than any other. Its roots run deep, with influences from a wide range of cultures throughout the world. As with any gumbo recipe, exact measurements are not required or encouraged, but are provided here merely as a general guideline.
Cooking Time: 3 hours
Serves: 12 to 15
Ingredients
- 1/2 cup vegetable oil
- 8 duck breast fillets, skin on or off, diced into 1- to 2-inch pieces
- Salt and pepper
- 1 1/2 cups each chopped celery, onion, and peppers
- 4–6 cloves garlic, minced
- 2 quarts chicken stock
- 3 bay leaves
- 1/2 teaspoon each cayenne pepper, onion powder, and garlic powder
- 2 teaspoons filé powder
- 1 cup flour
- 2 cups sliced fresh or frozen okra
- 1 pound andouille sausage, sliced
- 2 pounds shrimp (peeled, deveined, and preferably wild-caught)
- 1 cup seeded and finely diced tomatoes
- Warm cooked rice
- Hot sauce
Directions
Step 1 Heat 1/4 cup of the oil in a heavy pot over medium heat. Season the duck liberally with salt and pepper and add it to the pot. Cook, stirring often, until the duck pieces are evenly browned. Add celery, onion, peppers, and garlic. Cook, stirring often, for 10 minutes.
Step 2 Add chicken stock, bay leaves, cayenne pepper, onion powder, garlic powder, and filé powder. Bring to a boil and reduce heat to low. Cover pot and simmer until duck pieces are very tender, about 2 hours. While simmering, heat remaining oil in a small pot. Whisk in flour and cook, stirring constantly, until mixture (roux) is chocolate brown but not burnt. If the roux burns, start over. Once the roux reaches chocolate color, remove it from the heat and transfer to a heat-safe container. Allow to cool completely.
Step 3 Once the duck pieces are very tender, whisk in cooled roux. Add okra and sausage, then cook, stirring often, for 15 minutes. Toss in shrimp and tomatoes, and cook until shrimp turns pink. Adjust seasonings to taste. Serve in bowls over rice with hot sauce.
Flying Prime Rib
By Scott Leysath
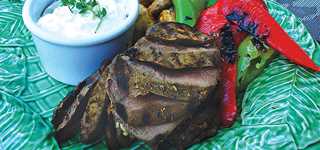
Picture a perfectly roasted, thick, medium-rare slab of well-seasoned prime rib. Now, if you're like me and quite a few others, this picture is not complete without a side of creamy horseradish sauce. It's no surprise that U.S. processors crank out about 6 million gallons of prepared horseradish every year. This white root adds varying degrees of bold, spicy flavor to sauces, which makes it an excellent accompaniment to beef, antlered game, and waterfowl.
The pungent horseradish root, with its sinus-clearing, eye-watering attributes, is a member of the mustard family. Prepared horseradish, the variety most commonly found in markets, is a combination of grated fresh horseradish root and distilled vinegar used to stabilize the heat. For a milder flavor, quickly toss the peeled and freshly grated root with vinegar. The longer the grated root stands without vinegar, the hotter it gets.
Peter Berry's Flying Prime Rib with Horseradish Fold
Preparation Time: 10 minutes
Marinating Time: 2 hours
Cooking Time: 10 minutes or less
6–8 appetizer servings
Ingredients
- 1/2 cup sour cream
- 1/2 cup mayonnaise
- 1 tbsp. (or more) grated fresh horseradish
- 1 cup extra-virgin olive oil
- 2 tbsp. Worcestershire sauce
- 2 garlic cloves, crushed
- 1 tbsp. coarse salt
- 1 tbsp. coarsely ground pepper
- 4 small to medium boneless, skinless goose breasts
Directions
1. Fold the sour cream, mayonnaise, and horseradish together in a bowl until blended. Chill, covered, until ready to serve.
2. Whisk the olive oil, Worcestershire sauce, garlic, salt, and pepper in a large bowl. Add the goose and turn to coat. Marinate, covered, for 2 hours, turning occasionally. Drain and discard the marinade.
3. Grill the goose over high heat to medium-rare. Remove the goose to a cutting board and let stand 2 to 4 minutes. Slice the goose across the grain into 1/4- to 1/2-inch slices. Serve with the horseradish sauce on the side.
Finding the Range
Take aim at trap, skeet, and sporting clays to fine-tune your waterfowl shooting skills during the off-season

Photo © Mark Tade
By Phil Bourjaily
Illustrations by Mike Sudal
Trap
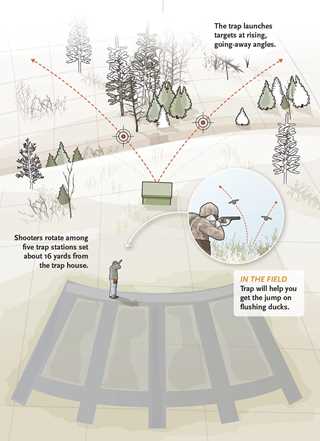
Trap is the oldest and most popular clay target game. Trapshooters rotate among five stations set up in an arc about 16 yards behind the trap house. The mechanical thrower—or trap—inside the house oscillates, launching targets at various angles from the shooter. For handicap trap, shooters stand between 17 and 27 yards behind the house. And in double trap, the machine doesn’t oscillate but throws two targets instead of one.
Most likely you’ll start out shooting 16-yard singles. In that case, load one shell at a time. You can have a live shell in your gun with the action open as you wait your turn. Remain at your station until the trapper or scorekeeper reads your score, then move to the next stand, keeping your gun open and unloaded.
Trapshooters have a reputation for being somewhat standoffish toward newcomers. There’s a bit of truth to that, because the actions of others in the squad can affect everyone’s shooting rhythm, concentration, and score. Just be ready when it’s your turn to shoot and remain quiet until it’s time to say “pull,” and you’ll be fine.
You will, however, need to control your empty shells. If you shoot an autoloader, you’ll absolutely need a shell catcher or a rubber band around the receiver to keep your empties from hitting the person to your right.
Guns and Loads
Shots at trap targets are long, around 35 or 40 yards. Using your duck gun with a modified, improved-modified, or full choke and an ounce or 1 1/8 ounces of size 7 1/2 or 8 shot will break any trap target. Be sure to bring 25 shells, plus a few extras. You’ll also need a bag or pouch to carry your live and empty shells. A hunting vest or a nail apron will work in a pinch.
Trap Tips
Consistency rules in trap. Your routine before the shot, as well as where you hold the gun and where you look for the target, need to be the same every time at a given station. For example, most shooters will hold on or above the left corner of the trap house when they stand at station
This isn’t hunting, so don’t rush to load and shoot. Close your gun and mount it on the hold point. Then get your eyes up off the gun and look into the distance above the trap house. Think a positive thought, and call for the bird. The whole sequence takes about three seconds.
Shoot just before or as the target peaks. Waiting too long, as many new trapshooters do, means you’re shooting at a dropping target that’s slowing its rotations, making it harder to break. It probably means you’re aiming, too, and trying to double-check to make sure you’re on the target. Trust your eyes and hands—and shoot.
What You’ll Learn
With its shallow, going-away angles, trap resembles jump-shooting more than it does any other kind of waterfowling. If you stalk ducks in sloughs, this is the game for you.
Trap also teaches fundamentals, including one a lot of waterfowlers have trouble with: keeping your head on the gun. Heavy duck and goose loads generate a lot of recoil, and many hunters develop a subconscious lift of the head to get up off the stock and away from recoil. Trap shooting punishes head-lifting mercilessly, causing misses over the top. You’ll quickly learn not only how to diagnose the miss but also how to correct it by keeping your head on the gun all the way through the shot—because if you do stick your head up to watch the target break, you’ll surely miss.
Skeet
Skeet was invented as hunting practice by two grouse hunters in the 1920s. There are two trap houses, a high and a low house, and eight stations on a skeet field. The first seven stations are aligned in a semicircle from the high house to the low house, and the last station is in the center of the skeet field, midway between stations 1 and 7. Skeet targets fly at the same height and angle every time, passing over a crossing stake set 21 yards from the stations.
Skeet is a more sociable game than trap, and conversation between shots is usually fine. If you shoot a break-action gun, cover the breech with your hand to catch empties, and stash them in a vest pocket or pouch. With pumps and autoloaders, let the empty cartridges fly and pick them up after the round is over.

Guns and Loads
Guns for skeet should have open chokes such as cylinder, skeet, or improved-cylinder. Serious competitors use size 9 shot to increase the probability of a hit, but 8s and 7 1/2s are also good target loads for this game. Competitive skeet is shot with everything from a 12-gauge to a .410-caliber shotgun, and all the targets are in range of small-bore guns.
Skeet Tips
In skeet, as in all clay shooting, finding the right hold point (where you start your gun) and look point (where you pick up the target with your eyes) makes the game easier. Although it’s tempting to call for the target with your gun pointing at one of the trap windows, try moving your muzzle several feet ahead, then cut your eyes back closer to the window so you can see the target sooner. When you set up that way, the target comes to the gun and seems to fly slower.
What You’ll Learn
Although it was invented for upland hunters, skeet actually offers more to waterfowlers. The clay bird on High House 1 is like a wood duck coming in from behind early in the morning. The incomers from Low 1 and High 7 are similar to diving ducks that don’t flare when they see you but speed up and keep coming. And the crossing shots at stations 3, 4, and 5 simulate ducks skirting the decoys.
In addition, the maintained-lead and pull-away methods that win on the skeet field work very well in the marsh too. Keeping your muzzle in front of real birds instead of trying to swing through them lets you move the gun slowly and under control instead of scrambling to catch a departing target.
Skeet competitors shoot with a premounted gun. But if you play the game the old-fashioned way and call for the target with a dismounted gun, you’ll be getting great gun-handling practice.
Sporting Clays
The game of sporting clays was imported in the 1980s from England, where it was called hunters clays because it duplicated field situations. It has since evolved into a game of its own, with targets that curl, bounce, fall, and shoot straight upward, as well as many that still mimic real birds.

A round of sporting clays consists of 50 or 100 targets, all thrown as pairs, and there are usually five pairs per station. No two sporting clays courses are the same, and every course changes periodically. Unlike trap and skeet, where perfect scores are common, sporting clays scores are much lower. Depending on the course, you should be happy to break more than 50 percent of the targets the first time out.
Paired targets come in three types: true pairs, in which both targets are launched simultaneously; following pairs, where one target is thrown shortly after the other; and report pairs, in which the second target is released on the report of your gun. There will be a sign at each station telling you what to expect. The shooting order rotates, so everyone takes a couple of turns as the guinea pig, going first at a new station.
The most sociable of the target games, sporting clays permits plenty of conversation, joking, and advice sharing as you make your way from station to station. You’ll need a bag to carry 100 shells and some extra ammo. A round of sporting clays will last at least an hour, so you might want to carry along a bottle of water as well. Some clubs rent out golf carts to transport you and your gear around the course, which can be spread out over several acres.
Do not load your gun until you have stepped into the shooting cage and your muzzle is pointing downrange. The first shooter gets to call for a “show bird” from each trap at a new station. You can look at the target and point a finger at it, but don’t point your gun unless you are in the shooting cage.
Guns and Loads
A 12- or 20-gauge duck gun with an improved-cylinder or light-modified choke is a good all-around choice for sporting clays. Although some shooters bring a variety of shells to accommodate different target distances, an ounce to 1 1/8 ounces of size 7 1/2 or 8 shot will cover all the bases. Choke changing is permitted before you shoot at each station, but once you start shooting, you must stick with what’s in the gun.
Sporting Clays Tips
Watch the show targets all the way to the ground to get a clear idea of how close or far away they are, and what they are doing in the air. Make a plan. For example, when shooting a true pair, decide which target you will break first and where you will break the targets. Sporting clays is like pool, in that you want to plan your first shot so it leaves you in a good position to shoot the second target.
Also determine where you will look for the birds and where you will start your gun. There’s a point in the flight of most birds at which they look big, fat, and easy to see. That’s the spot where you should plan to shoot it. Stick to your plan if it’s working, as you’ll have to execute it five times in a row to shoot the 10 birds. If your plan isn’t working—change it.
Whereas all the targets move at the same speed in trap and skeet, there are fast and slow birds in sporting clays. Pay attention to target speed and move your gun in time with the bird.
Start your muzzle where it won’t block your view of the target. For most birds, that means pointing below the line of flight, but it can also mean holding to one side of a bird like a springing teal, which goes straight up.
As with skeet shooting, you’ll have a hard time breaking long crossing targets if you try to swing through them from behind. Start your muzzle away from the trap and never let the target pass it. Stay in front of and below the clay bird.
What You’ll Learn
Sporting clays presents almost any waterfowling situation that you can imagine, from high overhead passing shots to long crossers to ducks dropping into the decoys and then flaring out of them. Unlike trap and skeet, however, sporting clays is harder to get grooved into because the targets are always changing. You need to learn to read the line of flight and put the gun in the right place, just as you do with unpredictable wild birds.
Because every station presents a double, you have to make the most out of both shots, a skill that serves you well when a flock of ducks or geese comes into the decoys. The fact that you can shoot without premounting the gun is another great advantage of sporting clays.
Some sporting clays stations have nothing to do with field shooting. If you’re there solely for preseason practice, go ahead and shoot only the stations that simulate the type of hunting you do. That’s the best way to find the range on the types of shots you’ll see come duck season.
Shotgunning: Patterning Makes Perfect
Follow these seven tips to pattern your shotgun for waterfowl
By Phil Bourjaily
Patterning a shotgun is one of the essential chores that we all should do during the off-season. It's not fun, but neither is missing and losing birds. Testing your shotgun and load will tell you if the combination delivers enough pellets on target to make clean kills, and whether the pattern is broad enough to easily intercept flying birds. Skip patterning, and you're firing blind when you shoot at a duck or goose.
Here are seven things to keep in mind as you search for the perfect shot pattern for waterfowl.
1. No Two Patterns Are Alike
Like snowflakes and fingerprints, no two shot patterns are exactly the same. In fact, there's a surprising amount of variation from one to the next. Therefore, you need to shoot more than one pattern with each gun, choke, and load combination you are testing. Ammo manufacturers take an average of 25 shots, although there's a diminishing return after 10.
2. No Two Shotshells Are Alike
If you're interested in figuring out percentages, you need to know exactly how many pellets your shotgun shells contain. Open up five cartridges from the same box, count the pellets, and figure out the average. Pellet counts, and even sizes, can vary a great deal among different lots of the same ammunition.
3. There Is No Such Thing as an Even Pattern
The mythical "even" pattern doesn't exist. Patterns are denser in the center and sparser at the fringes of a 30-inch circle, which represents the maximum effective spread of a shot pattern. Within the bell-curve distribution of pellets in a pattern, you will find clumps and gaps. All patterns have them. Changing chokes is one way to reduce the number of gaps. At close range, many chokes are too tight, leaving gaps in the pattern fringe. At longer ranges, a tighter choke may put more pellets in the pattern, closing some gaps.
4. Altitude and Weather Affect Patterns
If you pattern your gun in Portland, Maine, near sea level, and then take a goose hunting trip to Colorado's Front Range, the thinner air at 5,000 feet will cause you to shoot slightly tighter patterns. On the other hand, dense, cold air tends to open patterns. If you hunt in single-digit temperatures, your gun will shoot a slightly more open pattern than it does when you test it on an 80-degree summer day.
5. Pattern at the Same Distance You Shoot Your Birds
Everyone wants to shoot 90 percent patterns at 40 yards, but what does that choke-load combination look like at 25 yards, where you shoot your birds? At that close range, chances are you'll see a tight clump of pellets in the center and a sparse pattern along the fringes, which provides little margin for error. If that's the case, open your choke or go to a load like Federal's Black Cloud Close Range or Winchester's Xpert, which often shoot more open patterns than other shells.
6. A Pattern Is a 2-D Picture of a 3-D Phenomenon
Shot clouds have height, width, and depth. A pattern on a piece of paper shows only the spread of the pattern, not the length of its shot string. That said, shot strings with hard, round steel pellets are fairly short. "Shot stringing," or the lengthening of the shot column, therefore becomes a factor only when you take long, 90-degree crossing shots that cause some pellets to arrive too late to hit the target. The majority of shots at waterfowl, however, are taken at closer ranges and at less extreme angles.
7. Pellets Kill, Not Percentages
Pattern analysis can be as statistical as you want, or as simple as counting holes. Generally speaking, if your choke and load combination puts 90 to 100 pellets inside a 30-inch circle, that's enough to ensure vital hits on large ducks. For geese, you want to see 55 to 65 hits, and for small ducks about 130.
Basic Patterning Materials All you need for patterning is a roll of paper at least 36 inches wide, a 4x4-foot sheet of ply-wood, and a staple gun. You can make a crude compass with 15 inches of string and a felt-tip marker for drawing 30-inch circles.


